Introduction
Hello and welcome to this series of articles where we will learn about the basics of networking under the Linux operating system. Networking can be a big topic to cover, but once we get the basics down, you will soon realize that it's not so complicated as one might think. Home or office networks can greatly enhance your productivity and fun, so let's learn how networks work and how you can implement your self.
Networking Equipment
If you're confused by all the gadgets you can purchase for building a network, this section should clear up some of those issues. A network is made of several parts: physical wire and special hardware is usually dependent on what type of connection media you're using. An equally important component is the software that "talks" over the network. If we look at a network divided into layers, we can easily see the relation between the components of the network:
APPLICATION LAYER: This includes most programs that communicate over networks or the Internet, like your Web browser, FTP client, or your favorite multiplayer game.
TCP/IP LAYER: Still being software, this is the layer that handles translating the data sent by the applications over the physical connection. We will discuss how TCP/IP works later in the article.
PHYSICAL LAYER: This is where the physical hardware transfers the data sent by the TCP/IP layer to the other computers on the network. When the receiving computer receives the information, we go up the layers: The physical layer gives the data to the TCP/IP layer who translates it into data the programs in the application layer can understand.
Selecting Connection Media
Before I explain the software layers, we first need to select what connection media we will be using to build our network. There are a lot of choices when it comes to picking the hardware, in this section I'll talk about a few of the popular choices and give a brief description of each media to help give you an idea which solution might be best for you. By far the most commonly used media today is Ethernet. Ethernet is relatively cheap and offers many advantages such as high bandwidth and network expandability.
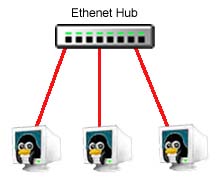
10BaseT: 10BaseT Ethernet is probably the most common Ethernet type. 10Base T is relatively cheap, operates at 10Mbps (ten megabits per a second) and makes it easy to expand your network in the future. 100BaseT (fast Ethernet) is also very similar to 10baseT Ethernet, with the only difference being that 100baseT operates at 100Mbps. Ten times faster. There is also Gigabit Ethernet which offers 1000Mbps of bandwidth. All *baseT Ethernet types use Twisted Pair cables which look a bit similar to your RJ11 telephone cables. This connection media requires an additional device called a hub to connect more than two computers together. When you're only connecting two computers with this media type, there's the option of only using a single cable between the computers. This will eliminate the need for a hub. This kind of network requires a special cable called a crossover cable. When having only two computers, a hub can still be used, and will give you the option of adding more computers. The diagram below shows a typical network connected with twisted pair cables and a hub.
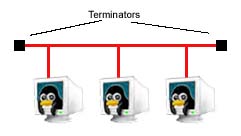
10Base2 Ethernet: 10base2 (also known as Coaxial) Ethernet is a bit less common than *baseT Ethernet. This flavor of Ethernet tops out at 10Mbps but is cheaper than twisted pair because the cabling is less expensive and it requires no hub to connect all the computers. The cables used by 10Base2 networks looks like your cable TV wire, it has round connectors on each end. Each computer is connected together and each end of the wire has a terminator to tell the network that no more computers are on that segment. Another illustration demonstrates how this is connected.
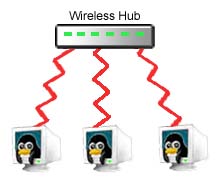
Wireless: Another network technology that has gained popularity recently is wireless networking. While still more expensive that traditional "wired" networks, wireless products are getting more affordable every day. Wireless Networks work in a similar manner as a 10baseT Ethernet network where there is a central hub that each computer talks to. Wireless networking also tops out at 10Mbps.
There are also a few other networking technologies on the market, but the three listed here are probably what most people will consider when building their home networks. Depending on the technology you decide to build your network with, you will need network cards that support the media you chose. You might also be required to buy a hub. Network cards are available as expansion cards and are inserted into each computer. Network cards are also available as PCMCIA devices so your notebook computer can be hooked up on the network. Of course, your computer may already have a network card. If your computer advertises itself as having "built in Ethernet" then there shouldn't be anything more you need to buy.
You may also need a hub, especially if you will be connecting more than two devices or trying to share an Internet connection. Hubs are devices that let each computer talk to each other. Hubs differ in the number of ports they have and generally the more ports on the hub means the more expensive it is. Hubs range from 4 port to 24 ports, and they can also be stacked, which means you can connect 2 or more hubs together to expand your network.
Network Speed
Some of you may wonder about what speed of network is sufficient for your needs. In the hardware descriptions, we saw that we had the choices of 10Mbits up to 1000Mbits. What those speeds measure is the amount of data transferred per second. Those speeds are calculated in bits rather than the more traditional bytes or kilobytes. Let's convert those numbers into kilobytes and megabytes to give a better view of what's the actual bandwidth you would have with each connection type.
| Bits/sec | KBytes/sec | MBytes/sec |
| 10Mbps | 1280 KB/sec | 1.25 MB/sec |
| 100Mbps | 12800 KB/sec | 12.5 MB/sec |
| 1000Mbps | 128000 KB/sec | 125 MB/sec |
| *56Kbps | 7 KB/sec | 0.006836 MB/sec |
*(Shows the speeds compared to a 56K modem)
If you wish to convert more units, an online converter utility is provided at: http://www.digitaldutch.com/unitconverter/index.htm
The table above compares the bandwidth of different connection media for your network. While 10Mbps is usually enough for small networks, if a lot of computers on your network need to transfer large amounts of data all at the same time, considering higher bandwidth media might be a wise decision. Another possibility, instead of opting for a high bandwidth media, is segmenting your network, which works by dividing your network into several smaller networks. Doing this usually requires a switching hub, to which other normal passive hubs are connected. This will give, for example, 10Mbps of bandwidth on each hub, separating the load on each network instead of 10Mbps for all computers connected to a regular passive hub.
Basic TCP/IP Configuration
Now that we have all the hardware set up, it's time to deal with the software side of the installation. Just like the Internet, computers on your network will talk to each other using TCP/IP (Transmission Control Protocol / Internet Protocol). TCP/IP is a way of sending packets of data back and forth across a network. The first thing this means is that each computer on the network will be assigned a unique IP address.
Remember, before jumping to configuring TCP/IP you need to have a
working network card in each computer. On Linux you're required to load
the appropriate module for your network card with the modprobe utility.
You need to know which module is the correct driver for your network card,
searching on Linux hardware sites might be helpful, or looking in the
/lib/modules/
If you have the Linux kernel source installed, looking in
/usr/src/linux/Documentation/networking might also provide you with more
information. The file net-modules.txt in
/usr/src/linux/Documentation/network/ will also list any command arguments
such as I/O and IRQ settings you might need to provide for that particular
module. Loading a module is pretty straightforward, below is an example
command loading the ne module, we specified the I/O and IRQ of the card,
but some modules don't need them.
After loading the module, the eth0 interface should be available.
Linux names each ethernet interface with ethX, where X stands for the
interface number, in case you have more than one network card in your
computer. If you're unable to find a module for your network card, it
doesn't means it's the end of the road. While many distribution compile
almost every module by default, your distribution might not have given you
that luxury; you might be required to compile the driver yourself.
Documentation on compiling a new kernel can be found at www.linuxdocs.org
or by looking in the /usr/src/linux/Documentation/ directory distributed
with every release of the Linux kernel source.
Let's start our configuration process by looking how IP addressing
works. Each computer on the network will have a unique IP address so that
other hosts on the network know where to reach it. An IP address consist
of 4 dotted decimal numbers. An IP address is not only used to reach the
host computer, but combined with a network mask, the IP address of the
computer shows which network it's on. Let's see an example to clear up the
matter.
With the network mask 255.255.255.0, we know that the computer is
on the the network with IP addresses starting with 192.168.1, and the
computer itself has the IP address of 192.168.1.30. Network masks are used
to divide networks into smaller networks, and this division is called a
subnet. To figure our which part of the address consist of the network
part and the host part, we do a "bitwise and" on the IP address and the
network mask.
Another important thing about assigning IP addresses on your
network is that they must not only be unique within your network, but if
your network will be connected to the Internet, IP addresses on your
network must not conflict with the IP addresses on the Internet. This
problem is solved by using the IP addresses reserved for private
networking use. The IP subnets that are thus reserved are the following:
In this article we will be using a subnet of 192.168.1.0 with a
netmask of 255.255.255.0. This will give us 253 host addresses to assign
to our computers, more than enough for a small home of office LAN. To
assign an IP address to a network card we use the ifconfig utility. Most
Linux distributions will likely have a network configuration utility which
will make the changes permanent between reboots. The ifconfig utility
assigns the IP but changes are not kept while rebooting. Many
distributions ship with the linuxconf utility which does have a network
configuration section.
Other distributions might have a command line tool,
for example on Slackware it's netconfig. You're probably better off
reading the documentation for your distribution and checking if they
provide a tool for network configuration. Some distributions might also
have the network settings in its boot scripts which are usually in
/etc/rc.d/* or /etc/init.d/*. For this article I'll only show you how to
use the ifconfig utility because it's a standard Unix command. Using the
ifconfig command requires root access, so be sure to be logged in with the
appropriate privileges. At the command prompt type:
What this command does if set eth0 (our Ethernet interface) with
the IP address of 192.168.1.1 and a netmask of 255.255.255.0. We would
type this command on every computer on the network while incrementing the
IP address by one for each computer. If we had 5 computers on our network
here's a listing of what our set-up would look like:
When all the computers have IP addresses assigned, we should test
the connection with the ping utility. What this command does is send
packets to the specified host, then the remote computer replies to those
packets giving us the time it took for the packet to complete its trip. At
the prompt type in the following and type CTRL-C to end the output:
The argument to this command is the IP address of another computer
on the network. If the connection works, and the computer replied to our
ping packet, we should get a reply which looks like this:
From this output we can tell a few things; the ping utility sent 5
packets before we closed it by hitting CTRL-C. The time it took for each
packet to do its round trip is around 1.2 ms (millieseconds). This shows
us that the computer at the other end of the line is in fact alive and we
can talk to it. I suggest you try this with each address on your network
to make sure each computer is connected properly. If you get a "Time Out"
error with the ping command, that means the remote computer cannot be
reached. If this happens check if the cabling is firmly attached and also
make sure you have the correct driver loaded and your network card isn't
conflicting with another device's IRQ settings.
By having your computers all talking to each other, you can now
use the network software services offered by those computers across your
network. You can use FTP to transfer files, telnet to log on to a remote
computer, or even play games. Most distributions of Linux come with FTP
and telnet already running, so you can start right away by typing the
following commands to use these services:
In this article we covered how to get you started with networking,
but in the next articles we'll explore fun things you can do with your
network. We'll see how to configure network services like DNS (Domain Name
System) so you can refer to your computers as domain names instead of IP
addresses. We'll look at NFS (Network File System) so you can mount file
systems across the network. We'll also look at SAMBA to share files and
printers with Microsoft Windows computers. In addition we'll see how you
can share one Internet connection with your whole network so all your
computers can access the Internet and much more. So if you liked this
article, look for the next articles in this series in the near future. modprobe ne io=0x300 irq=10
IP Address: 192.168.1.30
Network Mask: 255.255.255.0
Network Portion: 192.168.1.
Host Portion: .30
IP Address: 192.168.1.30
Network Mask: 255.255.255.0
IP (in binary): 11000000.10101000.00000001.00011110
Knowing this, you can divide your network into smaller networks
with the correct network mask. Each computer on the same network must have
a different IP address with the same network mask. For example, we could
have two networks with a network address of 192.168.1.0 and 192.168.2.0
each having a netmask of 255.255.255.0. And on both of these 2 subnets we
would have computers with IP addresses in the range of 192.168.1.1-254 and
192.168.2.1-254. The top most IP addresses (192.168.1.255 and
192.168.2.255) are used for broadcasting to all hosts on that subnet, so
you can't use .0 and .255 for the host portion in this example.
Netmask(in binary): 11111111.11111111.11111111.00000000
-----------------------------------
Bitwise and 11000000.10101000.00000001.00000000
Back to decimal: 192 .168 .1 .0
Netmask 255.0.0.0 IPs 10.0.0.0 - 10.255.255.255
Netmask 255.255.0.0 IPs 172.16.0.0 172.31.255.255
Netmask 255.255.255.0 IPs 192.168.0.0 192.168.255.255
ifconfig eth0 192.168.1.1 netmask 255.255.255.0 up
Computer 1: IP 192.168.1.1 - Netmask 255.255.255.0
Computer 2: IP 192.168.1.2 - Netmask 255.255.255.0
Computer 3: IP 192.168.1.3 - Netmask 255.255.255.0
Computer 4: IP 192.168.1.4 - Netmask 255.255.255.0
Computer 5: IP 192.168.1.5 - Netmask 255.255.255.0
Network Address: 192.168.1.0
Broadcast Address: 192.168.1.255
ping 192.168.1.1
PING 192.168.1.1 (192.168.1.1): 56 data bytes
64 bytes from 192.168.1.1: icmp_seq=0 ttl=255 time=1.3 ms
64 bytes from 192.168.1.1: icmp_seq=1 ttl=255 time=1.2 ms
64 bytes from 192.168.1.1: icmp_seq=2 ttl=255 time=1.2 ms
64 bytes from 192.168.1.1: icmp_seq=3 ttl=255 time=1.2 ms
64 bytes from 192.168.1.1: icmp_seq=4 ttl=255 time=1.2 ms
--- 192.168.1.1 ping statistics ---
5 packets transmitted, 5 packets received, 0% packet loss
round-trip min/avg/max = 1.2/1.2/1.3 ms
telnet
ftp
In The Next Articles